


Photoshop: Own a personalized Snow Globe
If you're eagerly waiting for the next tutorial from the "Create your own weather" series, I'm sorry but you're not getting it in this post.
With Christmas just round the corner, I've decided to give you a real treat!
Recently caught the typical Tim Allen flick Santa Claus 3: The Escape Claus. Err.. I'm not gonna go into details of the movie, like I said, it's just the typical Tim Allen movie. If you saw the movie, you would remember a scene when Santa gave Lucy a magical snow globe showing her hugging a snowman. That was just Sweeeet!! Damn, wish Santa would give me a personalized snow globe... Yah yah.. We adults should never believe in Santa. Soooo.. I've decided to take matters into my own hands and make my own DIGITAL SNOW GLOBE!
(1) Insane number of photos, so be patient!!!
(2) Freaking long tutorial, so be patient!!!
(3) Be patient!!! I promise it's worth it!!!

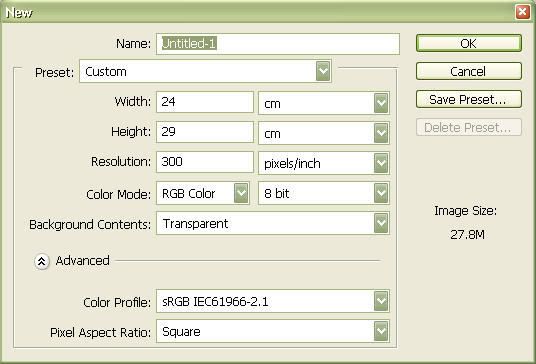
Step 1: Create a new document
- Create a new document with the settings as shown.
- Select "white" as your foreground color and fill the background with "white".
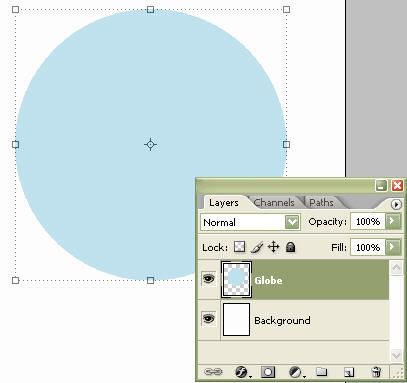
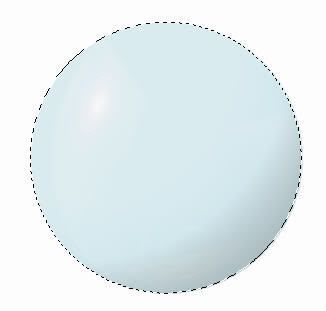
Step 2: Create and fill your marquee
- Create a new layer and then choose the Elliptical Marquee Tool.
- In the Style drop-down menu in the Options bar, choose "Fixed Size".
- Enter the settings as shown.

- Click in the new layer for a marquee of the defined dimensions to appear.
- Select a pale blue color and fill the marquee with the Paint Bucket.
- Name this new layer "Globe".
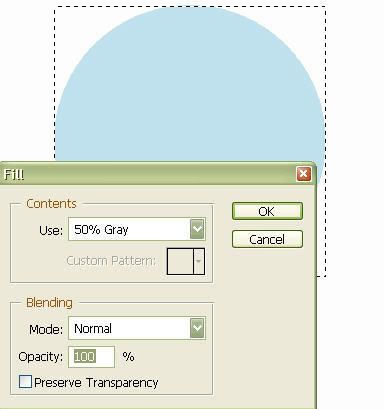
Step 3: Give your flare the polar effect
- Create a new layer and use the Rectangular Marquee tool to drag around the area of the circle.
- Choose Edit > Fill and then select "50% gray" from the pull-down menu.
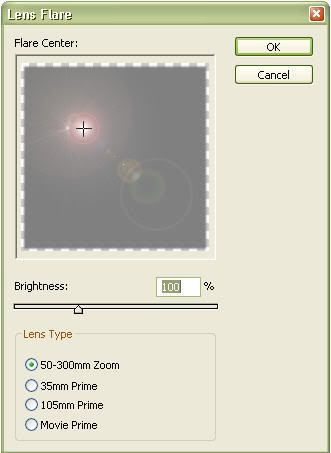
- Now, to create the lens flare, choose Filter > Render > Lens Flare.
- Position the flare in the upper left corner.
- Set the Brightness to "100%" and Lens Type to "50-300mm Zoom".
- Name this layer "Lens Flare".
Step 4: Flip the flare
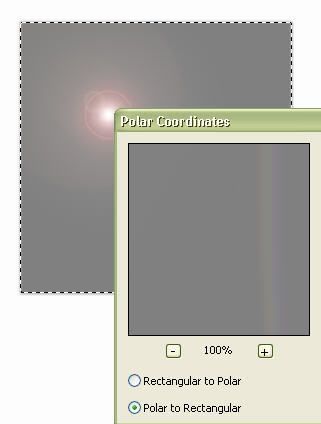
- Still selecting layer "Lens Flare", choose Filter > Distort > Polar Coordinates.
- Select the option "Polar to Rectangular" and click "OK".
- Now select Image > Rotate Canvas > Flip Canvas Vertical.
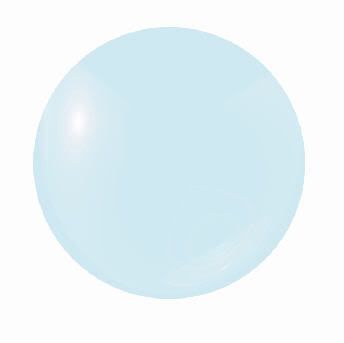
Step 5: Creating a shiny sphere
- Still selecting layer "Lens Flare", choose Filter > Distort > Polar Coordinates.
- Select the option "Rectangular to Polar" and click "OK".
- Set this layer's blending mode to "Hard Light".
- Ctrl + Click layers "Lens Flare" and "Globe" and position them to the top of the canvas.
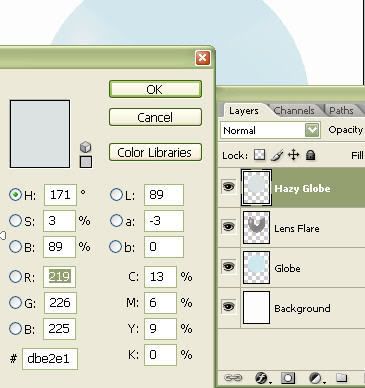
 Step 6: Give it a hazy effect
- Create a new layer and name it "Hazy"
- Click on the Color Option and enter R: 219, G: 226, B: 225 into the color picker.
- Selecting the layer "Globe", create an ellipse using the Elliptical Marquee Tool with the previous dimensions. Place this new ellipse in the same position as the sphere on this layer.
- Now, go back to layer "Hazy", fill the marquee selection with the color you have previously selected.
- Change the Opacity of this layer to "24%" and make sure it's the topmost layer.
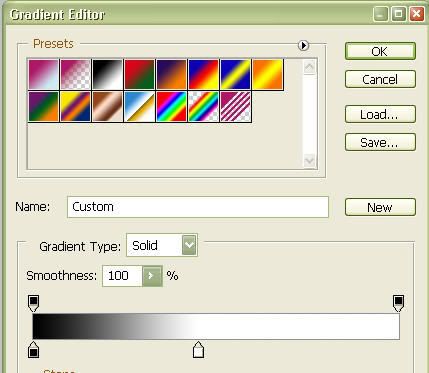
Step 7: Shading the sphere
- Selecting the layer you just created, make an ellipse selection (explained in Step 6).
- Create a new layer on top of the layer "Hazy" and name it "Hazy Globe copy".
- Now, choose the Gradient Tool and click on the swatch in the Options bar.
- Choose the Black/White preset in the Gradient Editor and make adjustments as shown.
Step 8: Give your globe dimension
- Check Reverse in the Options bar.
- Click and drag from left of the middle towards the bottom right of the marquee selection.
- Place this new layer below the layer "Hazy".
- Change the blending mode of the layer to "Hard Light" and the Opacity to "23%".
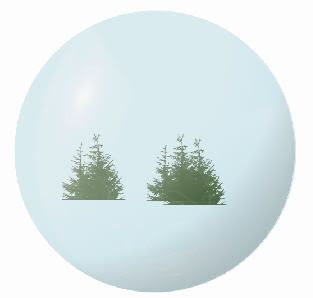
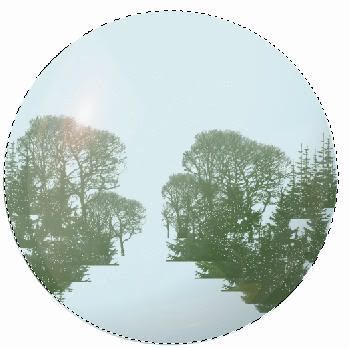
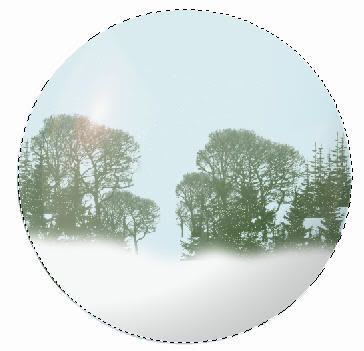
 Step 9: Adding your snow globe content
- Time to add your own pictures/creations into the snow globe.
- In the snow globe that I created, I created some variations of trees and brushed them into position.
- I shan't go into too much detail since your contents would differ from mine. However, below are some screenshots for your reference.
Step 10: A light scattering of snow
- Create a new layer and name it "Snow Trees".
- Select a round brush of size 5px and the following settings in the Brush Palette: Spacing of "500%", Maximum Count Jitter and Scatter.
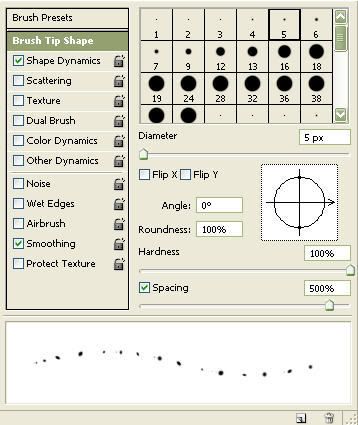
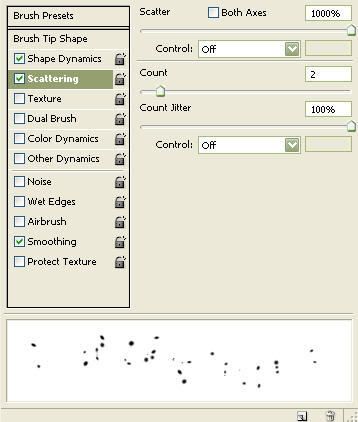
- Make sure your foreground color is "White" before painting over parts of the contents where you want a snow fall effect. In my case, I painted snow on the trees.
- Always remember to make a marquee selection around the sphere before you paint so that your painting will only apply to the selection.
Step 11: Snowy outlook
- Create a new layer and name it "Ground Snow".
- Select a soft round brush of size 280px, with the Scattering turned off in the Brush palette and reduce the Spacing.
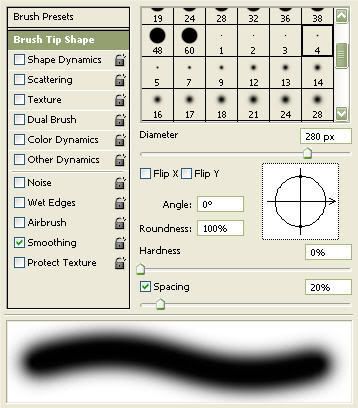
- Paint snow into the bottom of the trees or your content.
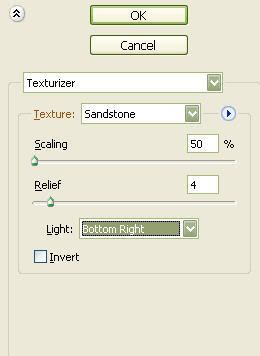
Step 12: Turn up the texture
- Duplicate the "Ground Snow" layer and make sure this new layer is above the former.
- With the "Ground Snow Copy" selected, go to Filter > Texture > Texturizer. Choose a Texture of Sandstone, Scaling of 50%, Relief of 4 and Light of Bottom Right and click "OK".
 Step 13: Snow Storm effect
- Include this step if you like to add some snow storm effect into your snow globe.
- Create a new layer and call it "Falling Snow".
- Make the foreground color "White" and the background color "Black".
- Now choose Filter > Render > Clouds.
- Use the Rectangular Marquee Tool to select a small area of this where there is a lot of contrast between black and white.
- Choose Select > Inverse and hit Delete to be left with a small section of clouds.
- Now, select Edit > Free Transform and drag the handles so that the cloud selection fills the area of the globe again.
- Choose Filter > Pixellate > Mezzotint and select "Coarse Dots" from the Type drop-down menu.
- Using the Magic Wand Tool, click on an area of black to select it on the "Falling Snow" layer.
- Choose Select > Similar for all areas of black to be selected as well.
- Hit "Delete" to be left with white specles.
- Reduce the opacity of this layer to "70%".

Step 14: Adjusting the snow storm
- Choose the Eraser tool on a low "Hardness" setting and "50%" Opacity.
- Rub away falling snow from the ground or any parts where you want less of the "Storm".
- Choose Filter > Blur > Motion Blur and set Angle to "-54" and Distance to "4 px".

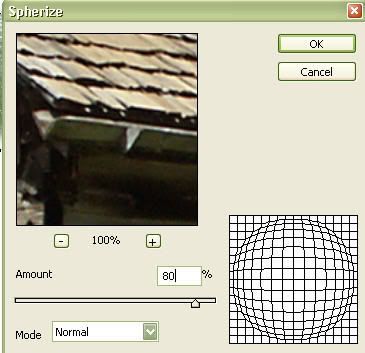
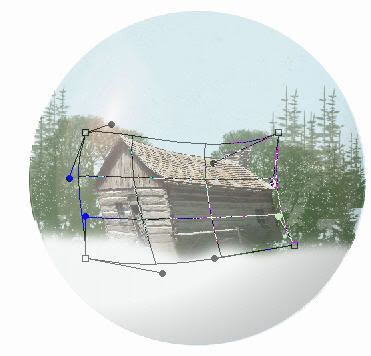
Step 15: Adding more content
- In my case, I have added a house in the middle of the snow globe.
- Since this is a sphere, we need to make some "Realistic Distortions" to the content.
- With an Elliptical marquee selected around the sphere and the new "House" layer selected, choose Filter > Distort > Spherize.
- Reduce the Amount to 80% and click "OK" and warp the house to distort it further.
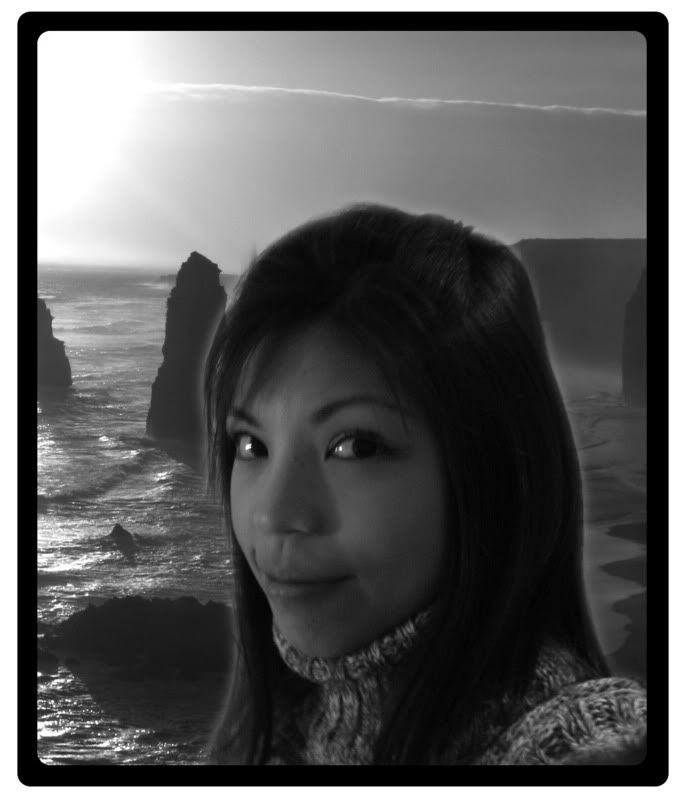
- I have done the same with the picture of Mikki.
 ***We're almost there!***
- Create a layer called "Base Top" above the "Background" layer.
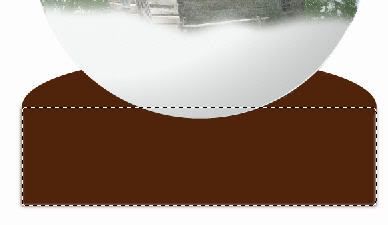
- Pick the Elliptical Marquee tool and select "Fixed size" as the style with width 18cm and height 5cm.
- Position the marquee as shown and fill it with "Brown".

Step 17: Build up the stand
- Create a new layer below the "Base Top" layer and name it "Base Middle".
- Pick the Rectangular Marquee tool and select "Fixed size" as the style with width 18cm and height 5cm.
- Position the marquee as shown and fill it with "Brown".
 Step 18: Create the Base
- Duplicate "Base Top" layer and name it "Base Bottom".
- Position the Ellipse below the "Base Medium" layer.
- Merge all 3 "Base" layers.
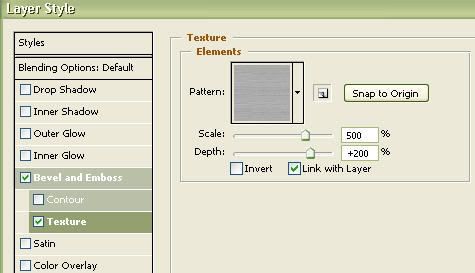
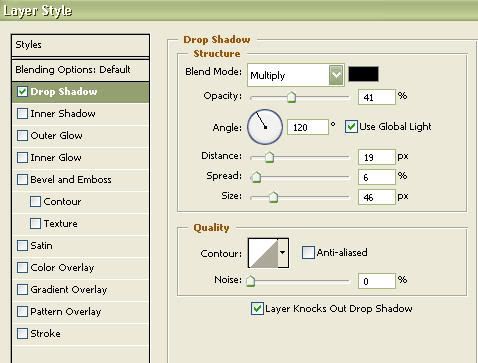
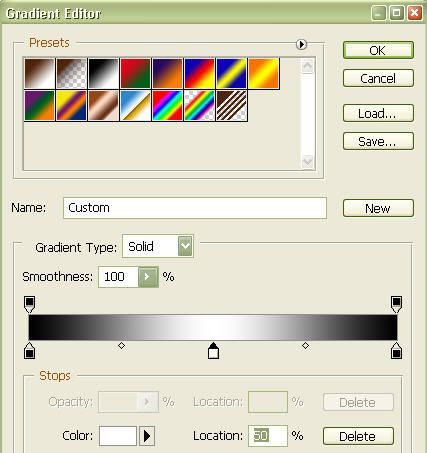
- Add texture, drop shadow and gradient to the "Base" layers as shown.
 Step 20: Add the mini base
- Duplicate the "Base" layers and resize it to "65%" with fixed aspect.
- Choose Edit > Warp. Pull the corners round slightly so they curve round the globe.
- Copy the layer style from "Base" layers and paste it to this new layer.
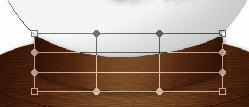
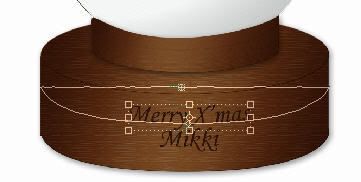
Step 21: Inscribe your globe
- Choose the Freeform Pen tool. Select Paths and check Magnetic in the Options bar.
- Go along the bottom edge of your base and double-click at the end.
- Now, choose the Text tool. Set the color of the text to brownish gray, and pick a font.
- With the Text tool selected, click the "Centre Text" option in the Options bar.
- Hover mouse over the path until it changes, and then click to type your text.
- When you are done typing, select the Move tool to move the text into the desired position.
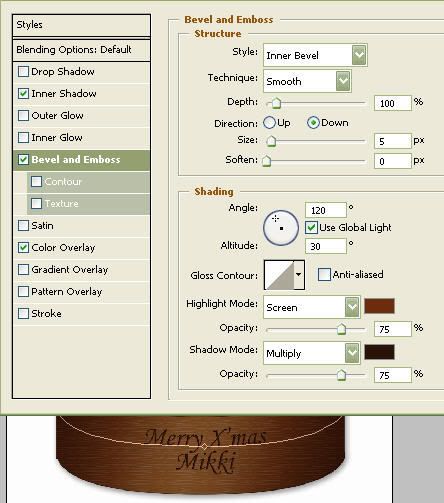
Step 22: Give it the Engraved look
- To achieve the engraved look, double-click on the Text layer and click on Inner Shadow in the Layer Style window.
- Enter a Distance and Size of 1px. In Bevel and Emboss, change the Direction to Down, Size to 5px and Soften to 0px.
- Finally, choose a highlight mode color of light brown similar to the one shown below.
Related Post: Photoshop: Create Your Own Weather - Part 1
![]()
![]()
![]()
![]()
![]()
![]()
![]()


0 Comments:
Post a Comment